

API keys and webhooks
Create scoped API keys, declare addresses that receive events, and follow past deliveries with their response code.
This is the technical part of the settings. It brings together 4 blocks: API keys, the passport shown in a partner's page, webhooks and their delivery log, then the connected AI assistants. The first two depend on the api_access entitlement, the third on the webhooks entitlement: one can be open while the other is locked. The fourth depends on no entitlement: a connection that was granted always stays visible to those who can end it. A client brand without the api_access entitlement still sees the second block, in a reduced form, when its reseller's setting applies to it.
#What the screen shows
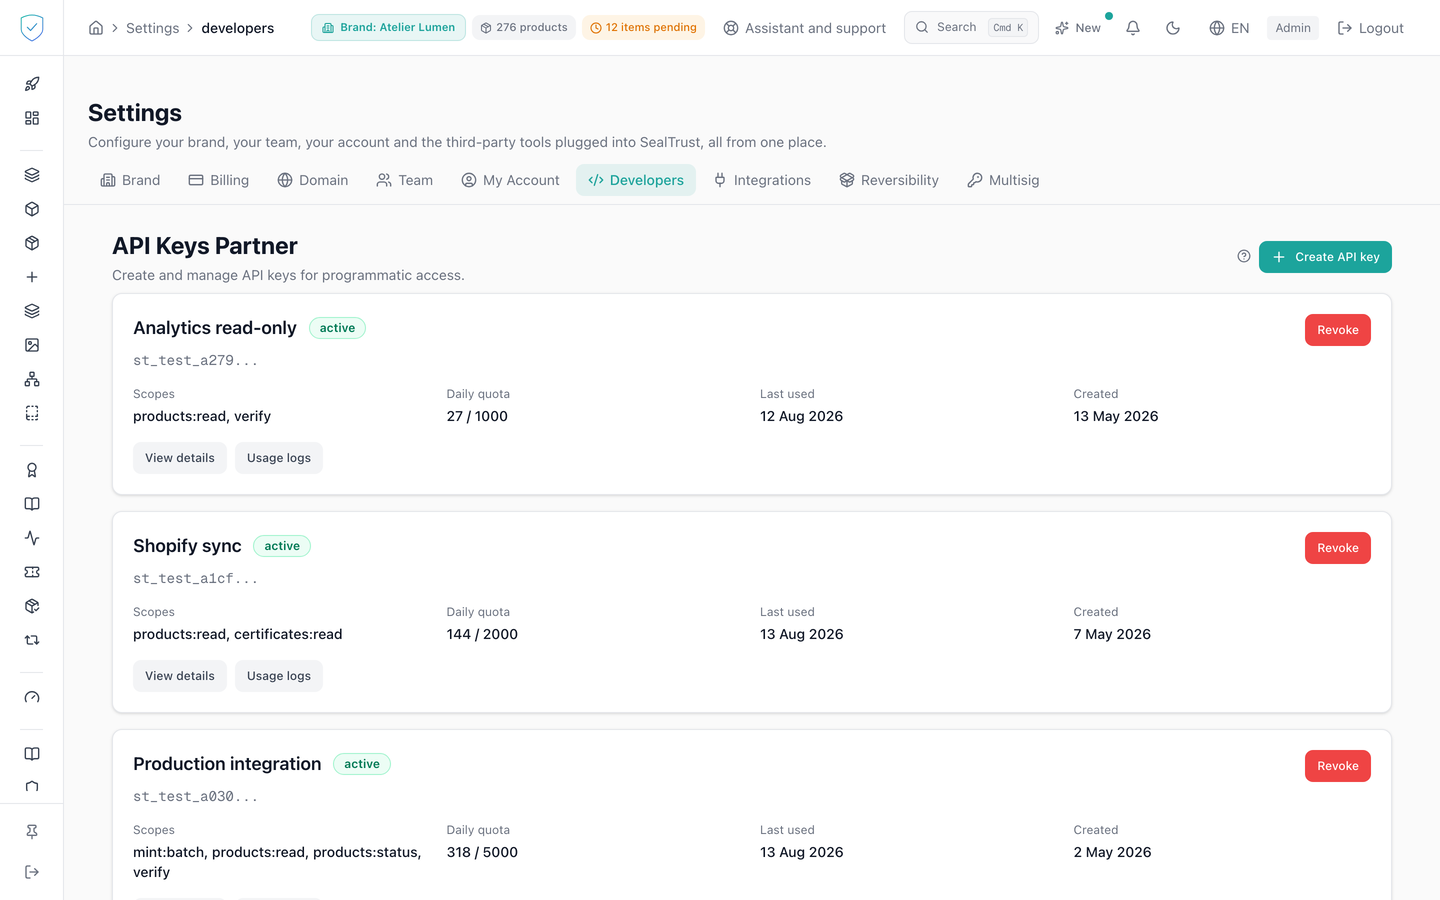
- One card per API key: name, state, the start of the key, scopes, daily quota, last use and creation date. A reseller key also carries the "Reseller" label.
- The creation window offers 11 scopes:
mint:batch,sellout:write,dispatch:write,catalog:read,catalog:write,passport:read,scans:write,nfc:verify,webhooks:read,webhooks:write,claim_codes:issue. Each one opens at least one API endpoint. It arrives pre-filled with the 3 read scopes (catalog:read,passport:read,webhooks:read), a quota of 1000 per day and a validity of 365 days. No write scope is ticked in advance: each one must be ticked by hand. - Ticking
mint:batchshows a warning: this scope creates products on the blockchain, and each mint costs gas (a network fee) paid by the brand. Grant it only to a partner that must mint. - Ticking
claim_codes:issuealso shows a warning: this scope issues purchase codes, and whoever holds a code can become the owner of the piece. Grant it only to the system that prints the codes (issue purchase codes). - The same window offers a "Reseller key" box, unticked by default. See Fill the catalog through the API.
- The "Passport shown in a partner's page" block shows the partner's web addresses, the partner page that shows a passport, and a "Send printed QR scans to the partner page" box. A label says whether QR scans go to the partner page or stay on the hosted page. When the setting in force is the reseller's, a sentence says so and names its brand. See Show the passport in your page.
- The webhook creation window offers 17 event types. The list is exactly the one the server accepts, and exactly the one we send: since 12 September 2026 a continuous integration guard refuses to let them drift apart. It used to offer 23, six of which nothing ever sent.
- The delivery log: timestamp, target subscription, type, state, response code, attempt number and duration. Unfolding a row shows the content sent and the response received.
- The "AI assistant connections" card: one line per assistant connected to the admin MCP server for one of your brands, by you or a colleague. Each line gives the application's name and the address where it receives its answers, its permissions ("Read the catalogue", "Prepare drafts"), the brand, the person who allowed it, the dates of connection, last use and end. See Connect the MCP server.
#What you can do here
- Create a key by choosing a name, a brand, scopes, a daily quota and a validity period.
- Create a reseller key, which also acts for the client brands of the chosen brand's reseller contract, on every partner API endpoint: catalog, passport display, minting, sale declarations and webhooks.
- Declare a partner's web addresses and the page that shows your passports, then send printed QR scans to that page. A reseller does it once on its own brand, for all its client brands.
- Remove a brand's own setting with the "Remove this brand's setting" button, after confirmation. The brand then follows its reseller's setting again, or the hosted page when there is none.
- For a client brand whose plan does not include API access: see that its scans go to its reseller's page, and keep them on the hosted page with the "Keep QR scans on the hosted page" button. It cannot declare a partner of its own.
- Copy the key secret. It is shown once only, at creation.
- Revoke an active key, after confirmation.
- End an AI assistant's connection with "End this connection", after confirmation. The assistant loses its access at its next request.
- Create a webhook subscription by giving an address and ticking the events you want. The signing secret is typed (32 characters at least) or left empty: the server then generates one, which the window shows only once with a "Copy" button, and it stays open until "I have saved it".
- See the list of subscriptions, each with its address, its events and a delivery state.
- Edit a subscription: change its address, tick or untick events, replace its signing secret.
- Enter a subscription's address and signing secret without the browser offering the login or the password saved for the console.
- Pause a subscription, then resume its deliveries.
- Delete a subscription, after retyping its address.
- Filter the log, then retry a failed delivery.
#What controls access
- The API key block depends on the
api_accessentitlement, the webhook block on thewebhooksentitlement, which is a separate one. - When a key is created, the server checks in order that the plan is active, that the
api_accessentitlement is present, then that the key quota is not reached. - The database keeps only a fingerprint of the secret and a 12 character prefix. A lost secret cannot be recovered.
- With no period given, a key expires after 365 days.
- The key creation button stays disabled while the name, the brand or at least one scope is missing.
- The webhook creation button stays disabled while no brand is chosen, while the address is shorter than 10 characters, while no event is ticked, or while a typed secret is shorter than 32 characters.
- The revoke button only appears on active keys, the retry button only on failed deliveries.
- A delivery counts as delivered when its response code sits between 200 and 299.
- A subscription's state reads "Answering" or "Not answering". It comes from actual deliveries, not from the pause switch: a paused subscription is not a broken one, and an active subscription whose address stopped answering is flagged as such.
- The secret field of an edit is optional. Left empty, today's secret is kept. Filled in, it must be at least 32 characters long, otherwise the save button stays disabled. A subscription is never without a secret: the server refuses to send an unsigned delivery.
- The log fetches the last 100 deliveries per subscription, while the server accepts 200 per call. The key list likewise stops at the last 100.
- An AI assistant connection is not in the key list and takes no seat of the key quota. It only appears in its own card, and it ends on its own after 90 days at most.
#What the screen refuses
- Without the matching entitlement, the block is greyed out and covered by a padlock stating that the feature is locked.
- A webhook address that does not use HTTPS is refused: "Webhook URL must use HTTPS".
- Retrying a successful delivery is refused: "Cannot retry a successful delivery".
- Retrying a delivery whose content was not kept is refused: "This delivery has no stored payload and cannot be retried; trigger a fresh event instead."
- A partner address that is not of the form
https://hostorhttps://host:portis refused, as is a partner page that is not on one of those addresses, and the redirect without a partner page. Nothing is saved, and the server's message names the refused value. - A reseller key is refused when the chosen brand has no reseller contract. The window shows the reason for the refusal instead of staying open without a word.
- Revoking a key warns that it cannot be undone and that every request in flight with that key will fail immediately.
- Deleting a subscription is only possible after retyping its address exactly. It destroys our half of the signing secret: recreating the subscription mints a new one, and the receiving system has to be reconfigured before it receives anything.
- Replacing the signing secret has the same effect on the receiving side: until it holds the new value, its signature checks fail.
Was this page helpful?
Your answer opens a pre-filled email in your mail app, addressed to contact@sealtrust.io. You read it over before sending it.