

Create a product
Create units one at a time, as rows typed by hand or from a CSV file, and preview what will be written on chain.
This is where new units are created, one at a time, as rows typed by hand, or from a file. Each unit is a piece: it gets its own token on chain and its own QR code to print, and its page shows the passport of its batch, or else of its model. The carrier you choose then decides what follows: chipped rows go into the tag preparation queue, rows with a printed code only go to the mint.
#What the screen shows
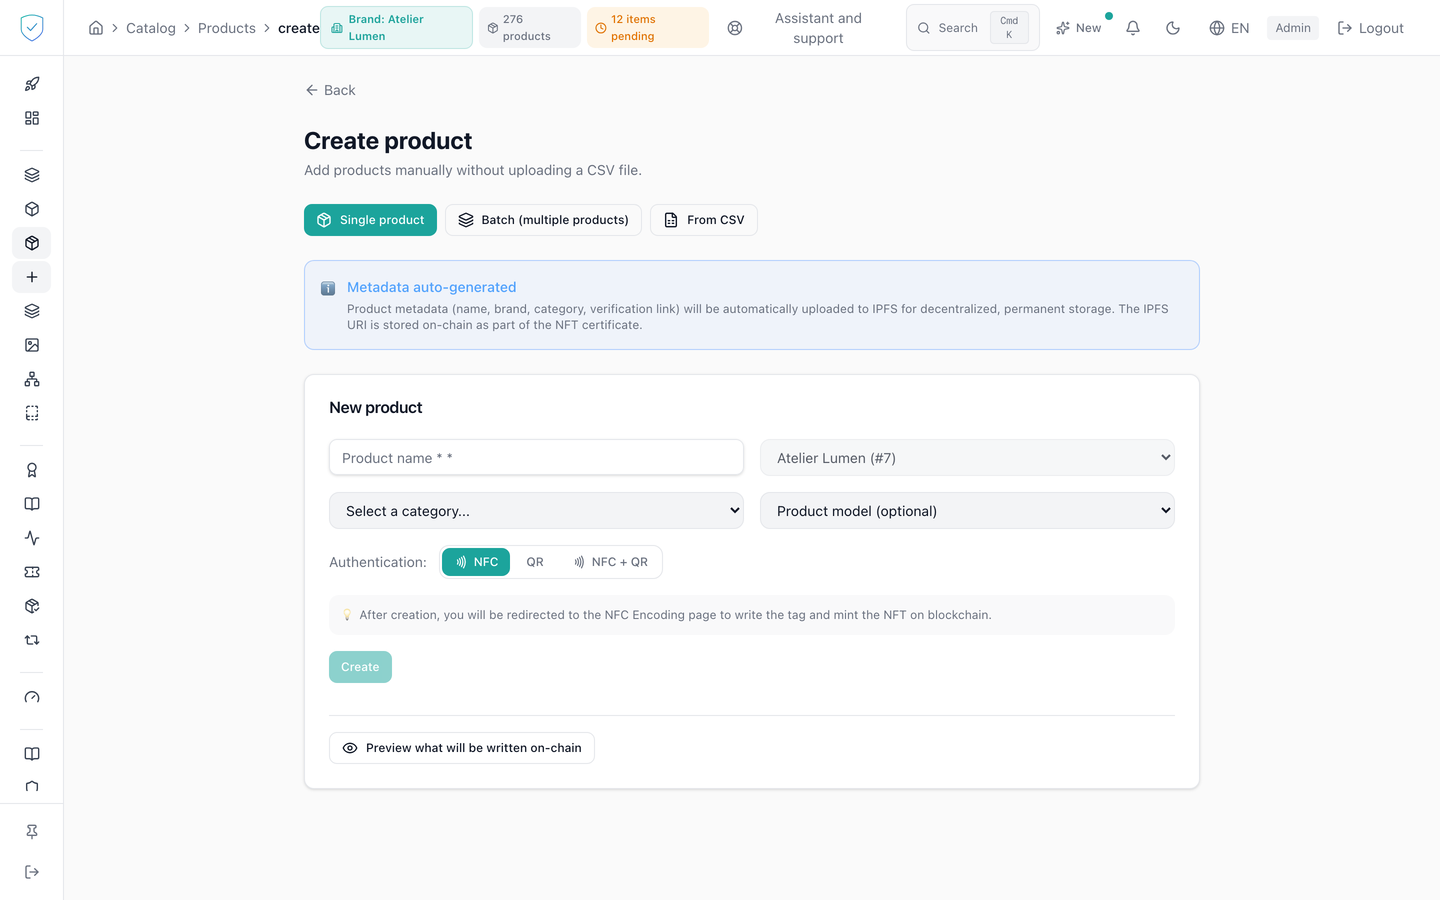
A banner at the top of the screen recalls what each piece created receives: its own token on chain, its own QR code to print, and on its page the passport of its batch, or else of its model. Each piece counts among the pieces of your plan. Then come three tabs: "Single product", "Batch (multiple products)" and "From CSV". A blue banner, "Metadata auto-generated", recalls that the metadata goes to IPFS and that its URI is written on chain.
In single mode: product name, brand, category, product model (optional), production batch (optional) and a selector for NFC, QR or NFC + QR. Choosing a product model fills the category with the one that model carries: without this, a product and its model could sit in two different categories, which changes the product's compliance scale. The category is chosen from a list grouped by family, below a search field, which batch mode hides for want of room in a table cell: the catalogue covers leather goods, fashion, watches and jewellery, beauty, home, electronics, electrical and lighting, plumbing and heating, building, industry and sport.
Opened from the "Add units to this batch" link of a batch page, the screen switches to single mode and arrives set on that batch, its model, the model's category, the batch's brand and the carrier chosen when the batch was created: a batch created as QR opens on QR, not on NFC. A batch that recorded no carrier keeps the usual setting, NFC. A sentence at the top of the form says so: "Opened from lot …: the units created here are attached to it." Batch mode keeps the same settings on every row, including rows added afterwards and the row reset after a submission. An address naming a batch the account cannot see sets nothing.
In batch mode: a numbered table, one row per unit, with an "Add row" button. Each row carries its own "Batch" column. An added row takes the brand, the category, the model, the batch and the carrier of the row above; only its name stays empty, since it changes from one piece to the next. When the rows do not all belong to the same batch, a warning says so under the table: "These rows do not all belong to the same batch. Check the Batch column before creating them."
A model still set to model passport only stays visible in the model selector, greyed out and followed by "model passport only, switch it to units from its page": it cannot receive a unit until its page switches it to units.
The product model selector and the production batch selector only offer what belongs to the brand chosen in the top bar; the batch selector further narrows to the row's brand, and to its model when a model is chosen. That link is what makes the unit anchorable: the Merkle anchor is computed per batch, so a unit created without a batch can never be anchored, and no route attaches it afterwards. The "Awaiting minting" page says as much: an item created outside a production batch has no batch to link to.
In CSV mode: the required and optional columns, a preview of the first 5 accepted rows, the count of valid rows and refused rows, and the choice of mint mode. At most 20 refused rows are detailed, the following ones are summed up by a count.
After the submission, a green banner counts separately the rows sent to encoding and those sent to the mint.
#What you can do here
"Preview what will be written on-chain" shows the cover image, the exact metadata JSON and warnings: missing model, model without an image, missing category, no active contract registered. The preview sends nothing on chain and uploads no file, it calls the same computation functions as the mint.
This metadata can no longer change after the mint: its fingerprint is written on chain and the contract has no function to change it. It says:
description: "Registered with SealTrust. Brand: … Category: …". The chain records a number; it does not prove that an object is the original, so the sentence never says "authenticated".external_url: the piece's public address,https://sealtrust.io/p/<serial number>, the same as its printed QR code. Each piece draws its serial number at mint, and its product page carries that same number. The preview therefore cannot show it: it writes{serial}in its place, and a sentence under the JSON says so. Everything else is written as shown.
Tokens minted before this change carry the former sentence "Authenticated by SealTrust" and the technical address https://sealtrust.io/verify?u=<fingerprint>, which still leads to the piece's verification. They cannot be rewritten. The piece's public page says "Registered number".
One reserve about the image: the preview shows it under its original address. A piece with a printed code only, minted from this screen, writes that address. A chipped piece, minted when it is encoded, has its image pinned on IPFS first, and the ipfs:// address is the one written.
You can add and remove rows in the batch mode table. In CSV mode, load a CSV file, correct the file from the refusals numbered by row, then import. The required columns are product_name, brand_id and category_id, the optional ones external_ref, metadata_uri, owner_email, product_model_id, product_batch_id and auth_method. You choose the default authentication method for the rows that do not state one, then the mint mode: one transaction per product, or a grouping announced up to 50 products per transaction. That choice travels with the request and holds for this import only, it modifies no server setting.
Preparing a batch creates its items with the ready_to_scan status.
Issue the purchase codes of the QR pieces while creating them, with the "Issue a purchase code for each QR piece" box, never ticked in advance. It only appears when the submission holds QR pieces, and can only be ticked when all those QR rows belong to the same batch: the codes come back in that batch's QR archive, the only place they are shown. Otherwise a sentence says to put the QR rows in one batch, or to issue the codes piece by piece in the claim rules. Ticked, the submission goes through the same door as the batch page: the QR rows are prepared as one job, then minted with the codes issued. The success banner then points to the batch page with "Open the batch": once the mint is done, its QR archive holds the purchase_codes.csv file, and each code is only in the first download. The chip pieces of the submission get no code from this box. A brand on the Compliance offer sees the mint refused with the OFFER_EXCLUDES_IDENTITY code, and the prepared job is cancelled, so that no QR piece is left waiting for a chip that will never come.
#What conditions access
This screen serves the identity of pieces. For a brand on the Compliance offer, its menu entry stays visible but locked, marked "Identity", and the server refuses its operations with the code OFFER_EXCLUDES_IDENTITY (the two offers).
The create button stays inactive as long as the name, the brand and the category are not filled in, and in batch mode a single incomplete row is enough to keep it inactive. The preview button stays inactive as long as no brand is chosen. The last row of the batch mode table cannot be removed. The "Encode NFC tags" link in the success banner is reserved for certain brand profiles. The form draft and the active tab are kept, a return to the sign-in page does not erase them.
At the mint, the server checks, brand by brand, that the plan is active, that the cap of a trial account is not exceeded, and that the requested authentication method is allowed by the plan. For rows with a printed code only, the identifier is generated by the server, it is never accepted from the browser.
#What the screen refuses
- A missing name, before submission: "Product name is required for each row." A missing brand: "Brand is required." A missing category: "Category is required."
- More than 10 000 rows in one submission: 400, with the instruction to split the file.
- An authentication method the plan does not allow: 403, code
AUTH_METHOD_NOT_ALLOWED, with the list of allowed methods. - On a trial account, going past the 10 products of the billing period: 403, code
QUOTA_EXCEEDED, with the current count, the requested number and the monthly ceiling. A plan sold counts pieces per calendar year and prices those beyond the included ones: this refusal never happens for pieces. - A unit linked to a model still set to model passport only, directly or through its production batch: 409, code
MODEL_LEVEL_IDENTITY. The screen says that the model is declared as a model passport only, that no unit is created for it, and asks you to open the model and choose "Create units for this model" first. Nothing is created or queued. - A unit linked to a model or a production batch that does not exist, or that belongs to a brand other than the product's: 404, code
UNKNOWN_PRODUCT_REFERENCE. The screen says that this model or batch does not exist for this brand. The answer is the same in both cases, so that nothing is revealed about another brand's catalogue. Nothing is created or queued. - A CSV missing a required column: "CSV is missing required columns", and nothing is imported. A CSV in which two columns carry the same name once spaces are removed is refused entirely.
- A CSV row with an unreadable value: it is listed with its row number, its column and the value written in the file, and it is not imported.
When an error mentions the plan, a link to the billing page of the brand concerned is added under the message.
Was this page helpful?
Your answer opens a pre-filled email in your mail app, addressed to contact@sealtrust.io. You read it over before sending it.